|
| |
|
|
|
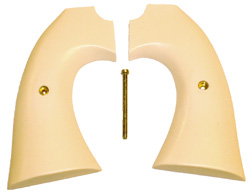
Two-piece grips are those which are mounted to the gun by using one or more screws. They are supplied as two panels, left and right side. Some grips are mounted using one single screw which fits a pressed-in nut or threaded bushing in the opposite grip panel. These are offered with the option of having a standard grip mounting screw kit installed. Generally, the only requirement is that the hole in the grips allows a screw to pass through the gun frame without interference with any gun parts. The thread and screw size normally does not matter, because the only requirement is that the screw fits the threaded nut pressed into the opposite panel. 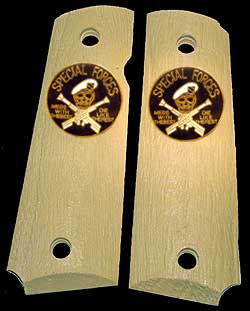
Other two-piece grips may be mounted using a screw which threads directly into the frame of the gun, one screw or two screws per panel. The location of the hole or holes is critical, to match the gun's threaded holes. Generally, Tombstone does NOT furnish the screws in this case, but depends on using the ones which came with your gun. With some pistols one threaded hole through the frame is used for two separate, shorter factory screws. This allows the option for using either your original screws, one per panel, or the Tombstone universal mounting kit with its own ferrule and nut installed with the next size smaller screw diameter. (An example might be the Browning 1910 or the Colt 1903 auto, which can use two short screws of about No.3 diameter, or the universal No.2 Mounting Kit with a single screw.) 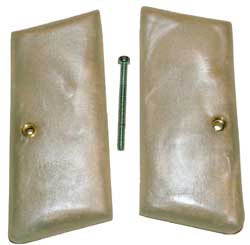
To make sure the size, shape, and screw hole location fit your particular version of this model of gun, remove the grips from your gun and place them back-side down on 3 x 5 index cards. Use a sharp pencil to draw or trace around the outside of the grips. Important! If you want to order the grip with the screw installed, make a mark on the index card showning the screw hole location, by holding the grip panel securely and rotating the screw against the index card through the mounting hole. Or if your pencil is thin and sharp enough, mark the index card through the hole with the pencil instead. Make one tracing for each of the two panels, left and right, even if they are the same size. This will provide some tolerance checking. This also provides two tracings so that one might be cut out and used as a template, keeping the other in reserve for measurement. Cracked or Broken Grips If you have cracked or broken grips now, you can still trace around them as far as possible, and "dot in" the missing portions to show where the grip should be complete. Even incomplete information is better than none! Tombstone grip kits will require some sanding and possibly clearance cut-out or routing with a "Dremel" tool on the backside. To allow for fitting, the grips are normally made slightly larger. This lets you fit them to your gun frame even if the original tracing didn't show the entire outline. Missing Grips If your gun is missing its grips, you can still make a good tracing of the frame, to show the outline where the grips should fit. It also helps to trace the inside of the frame to show where the mounting screw might go. Usually there is a fairly large area in which the screw would work, but some guns have only a small hole through which the single mounting screw must fit. It is good to mark this on the tracing, especially if you want the grip mounting kit installed. To make a frame tracing, hold the 3 x 5 index card firmly against the frame, and trace around the outside first. You can press the paper firmly against the edge of the frame to mark it, if you wish, but a tracing also helps greatly. Then, cut out the tracing so it makes a pattern or template. Hold it against the gun, and make absolutely sure that the pattern actually fits the gun all around, especially at the top. When you are satisfied with the cut-out pattern, and it first your gun just like you want the grip to fit, make another template for the other side. In some cases the two sides will be slightly different because of frame tolerances or design features, especially with autoloading pistols. But make a template for both left and right side, even if they are the same size. Check the two templates against each other, and if they are supposed to be the same size, make sure they are. If you cut too small, you can tape a piece of index card back to the template and cut it again. It doesn't have to be pretty, just accurate. Mark the inside outline on the template after you have it corrected to match your gun exactly. Hold the template against the gun firmly and mark with a pencil where the screw hole can go, around the hammer spring and any parts of the frame that would interfere with the screw. If there are spacers or cut-out on the back of the grips that are required to fit on your gun, you can mark them if you wish. In most cases, the backs of the grips are flat as shipped. You can use a rotary bit hand tool, such as the Dremmel, to relieve any areas required. The alignment pin hole on the back of some grips needs to be made after the grips are fitted. It is easy to do by "painting" the tip of the projecting pin, on the frame, with "Magic Marker" pen ink and then pressing the grip in place to transfer a dot where the hole goes in the grip back. Use a grinding bur instead of a twist drill to make the hole, since it won't tend to "pull" into the grip and go right through it. Usually a rotary tool will come with several bits. Some of them with a cylinder shape are great for making alignment pin holes. |
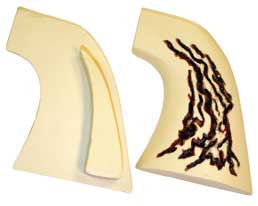
One-piece grip kits are supplied with two panels (left and right) plus a spacer, which you fit to the gun, and then epoxy glue together to make a 1-piece grip. These grips ONLY work on guns intended for them. The gun would have a removable back strap, like the Colt 1860 Army or the original Colt 1873 Peacemaker. This kind of grip will NOT work on, say, a Ruger single action with solid grip frame. You can tell whether or not your single action revolve will accept a 1-piece grip (all of them will accept a 2-piece grip with screw). Here's how: see if the back strap is held on by screws, and can be removed. If it can be removed, your gun can use either 1-piece or 2-piece style grips. If it can't be removed, then there is no way to install a 1-piece grip so you can't use it. Because your original 1-piece grip cannot be placed back-side down on an index card, you must make a template (pattern) using a 3 x 5 index card that is held against your gun. First, remove the backstrap (screws usually next to the hammer and at the front base secure the back strap to the rest of the frame). 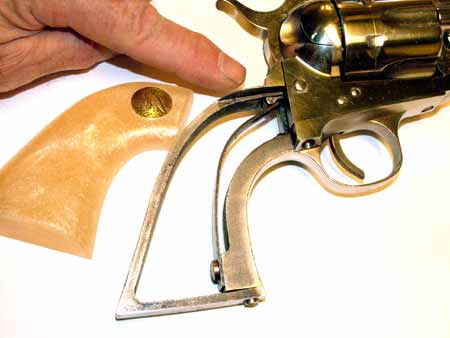
Remove the grip from the frame or backstrap. Usually the backstrap and grips will come off together, as the grips form a "pinch fit" against the sides of the backstrap. Tapping on the grip rear edge with a plastic mallet or a wood wedge will usually separate the grips from the backstrap. When you have them separated, replace the backstrap on the gun leaving the grips off. Now you can place a corner of the 3 x 5 index card firmly into the top front edge of the frame, next to the hammer. Align the edge of the paper with the top or front of the frame where the grip normally goes. If the top and front form a 90-degree angle to each other, then the corner of the index card will fit perfectly. If there is some other angle formed, one side will not quite match. Trim the 3 x 5 index card so that it fits exactly. This is important. Your new grips will have exactly this same angle and will fit the same way. It may be easier to support the gun and card on a book, placed on the table, so that the thicker cylinder area can hang over the edge to let the grip frame lay flat against the index card. In fact, you might find it even more stable to support the gun barrel on another book or a few magazines, something to let the gun remain stable while you trace the grip frame. Now, hold the card in place and trace around the outside of the frame with a sharp pencil. The line you draw will be considered the minimum size for the new grips. (They can be larger, because you can easily sand them to exact size.) When you have an accurate outline, cut it out with scissors to make a pattern or template that exactly fits your gun, just the way you want the grips to fit. If you cut too much, you can tape a "patch" back on and re-cut it. I will use your pattern to match the backside of the new grip, so get it reasonably close, not smaller than your gun. If it is slightly larger, you can sand the new grips down a little. 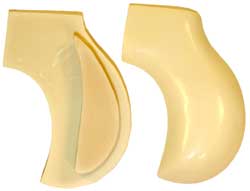
When you have a good fit, hold the pattern on the gun and trace the inside of the frame and hammer spring, so I know about how large and what shape of inside spacer to send. The spacer must fit where there is no spring or frame in the way, to let you glue both grip panels to it and form a one-piece solid grip out of the three pieces I will send. 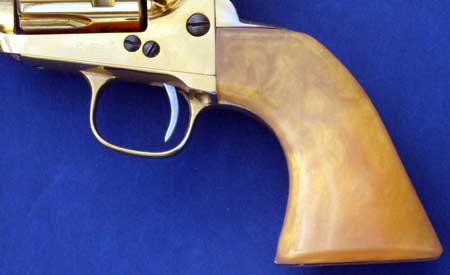
Another way to mark the outline of the gun frame on a 3 x 5 index card is to "paint" the edges of the gun frame with a "Magic Marker" and then press the paper against the gun and rub with your fingernail or a piece of wood to transfer a good sharp outline of ink to the paper. Don't try to make a "rubbing" with the pencil, as it will be hard to see exactly where to cut to make the pattern. The ink will easily wipe off your gun with a cloth dampened with "Hoppe's" or just a little alcohol or other solvent. The goal is to send as accurate a tracing or pattern as you can make, so that the grips can be held up to it and if they match all the way around, or are just slightly larger, they can be fit to your gun exactly with a little sanding at the edges. If your pattern is too far off, or hard to use, then your new grips might not fit your gun even though they seem to fit the template. PLEASE DO NOT SEND corrugated cardboard or other thick, hard to cut material. Sometimes people get very creative and send all manner of unusual materials, including big blocks of styrofoam with the grip impression pressed into it, clear acrylic sheeting, or even plywood. But none of that is very accurate or easy to use. In fact, most of it is useless as a pattern. For the same reason, it is very difficult to use the actual 1-piece grip itself to match with the new grip panel shape and size. With the two panels fastened together, there isn't a good way to create an accurate pattern using the flat backside of one of the two panels! That pesky spacer gets in the way. Besides we really want to match the frame, not the old grips. So a pattern that fits your frame is far better than one that trys to match the old grips. The very best material is an ordinary 3 x 5 index card. It is stiff enough to make a good pattern, and thin enough to cut easily and accurately, yet tough enough so it won't tear while you trace and fit it. If you send anything else, including a photocopy or a picture or an emailed or faxed image, it won't work. All the steps of electronic image creating and printing distort the size. It's the same as not sending a tracing. Thats why the best thing to use is a regular 3 x 5 index card, sent via regular mail. |
|
Information to Send with Tracings:
With any tracing, be sure to clearly print or type this information on the index card or templates:
If you have NOT placed an order yet, please write "no order pending". ! Mail your template with the necessary information indicated above to... PO Box 3955 Central Point, OR 97502 
|
|